Mini Brandy Chocolate & Margarita Cuptails

I love this time of year as it is officially the Christmas season and all the decorations and lights go up. I was not going to put my decorations up this year as I leave for home on the 11th of December, but I put some of the lights up on the weekend and I cannot resist now not hanging the rest of the decorations.

As I am an Australian, I do miss the hot Christmas' and I am very much looking forward to it this year. However, after living the UK for the past 6 years I am actually going to miss the cold Christmas, especially the mulled wine. Luckily, I have some great friends who have ‘happily’ accompanied me along too as many Christmassy things that I can physically fit in before leaving for sunny Brisbane. Though hearing carols at the Southbank Christmas Markets in November was even a bit much for me… Mariah Carey's "All I Want for Christmas" does get slightly irritating after about the 20th time!

These little festive treats I actually made a number of weeks ago. The order was for some 60's themed cupcakes, so my first question was Mad Men or psychedelic? If I went down either route without clarifying, I think it could have gone horribly wrong. It was quickly confirmed that I should go down the “Mad Men” 60's theme route and I started thinking, what do you think about when you think Mad Men... and BOOZE topped the list.


These CUP-TAILS as they call them would serve as a great accompaniment to any party as they are small enough to be served alongside canapés. And the kick of booze in the cake and icing is probably better and tastier than a shot of tequila… though I would not mind of side of that as well!

Brandy Mini Chocolate Mini Cupcakes


Makes 23 - 30 mini cupcakes

Ingredients
40g unsalted butter, at room temperature
140g caster sugar
100g plain flour
20g cocoa powder
1 1/2 tsp baking powder
1/2 tsp finely grated orange zest
1/4 tsp salt
1 large egg
50ml brandy
80ml whole milk

For the icing
75g unsalted butter, at room temperature
225g icing sugar
30g cocoa powder
3/4 tsp finely grated orange zest
15ml whole milk
15ml brandy

Preheat the oven to 170 degrees Celsius, and line mini cupcake tin with cases.

Mix together butter, sugar, flour cocoa powder, baking powder, orange zest and salt in a mixer. Keep mixing until the ingredients have come together and resemble fine breadcrumbs.

Break the egg into a jug, add the brandy and milk and mix together. With the mixer on a low speed, slowly pour the liquids into the dry ingredients and mix until smooth, scraping down the sides of the bowl to include every bit of the mixture.

Divide the cake batter between the muffin cases, filling each one two-thirds full. Bake for 12-15 minutes or until the tops of the cupcakes bounce back when lightly pressed, then leave to cool completely on a wire rack.

To make the icing, on a low speed, mix together the butter, icing sugar, cocoa powder and orange zest until combined and sandy in consistency. Pour the milk and brandy into a jug, then pour this into the butter and icing sugar mixture, while still mixing on a low speed. When all the liquid is incorporated, increase the speed to high and beat the frosting until soft and fluffy. Pipe or smooth icing onto cupcakes with a palette knife and decorate with chocolate sprinkles.

Margarita Cuptails


Makes 23 - 30 mini cupcakes

Ingredients
125g unsalted butter, at room temperature
125g caster sugar
2 tablespoon tequila
2 eggs, at room temperature
125g self raising sugar
1/2 tsp baking powder
2 tbsp semi-skimmed milk

For the middle
260g lime jelly

For the icing
125g unsalted butter, at room temperature
2 tablespoons tequila
250g icing sugar, sifted
1 tablespoon semi-skimmed milk

Preheat the oven to 180 degrees Celsius and line cupcake trays with liners.

Add the butter, sugar and tequila to the mixer and cream together for 7 minutes, or until light and fluffy.

Add the eggs, one by one, and mix for 2 minutes.

Mix the flour and baking powder together in a separate bowl, then add to the mixer and mix until incorporated. Add the milk and mix for a further minute.

Divide the mixture between the cases and bake for about 12 minutes.

Remove the baked cupcakes from the oven and then transfer immediately to a wire rack to cool.

To make the icing, cream the butter and the tequila together in the mixer for 2 minutes until light and fluffy.


Add the icing sugar and milk and mix for a further 2 minutes until well blended.

Chill in the refrigerator until ready to use.

Once the cakes are cooled, remove the centre of each cupcake. I found the easiest way to fill the cupcakes was putting the jelly into a piping bag, much easier than trying to use a spoon, especially for mini's.


Ice the cupcakes with a palette knife or use a piping bag - which again I find easier as they jelly will tend to jump about using a knife! Its jelly, it doesn't sit still :)

I decorated these with some green neon sprinkles, but you could do some lime rind.

Arriba!


Happy Baking x

Battenberg Cake

I know it sounds clichéd, but this year has flown by. I cannot believe it’s the end of November and I guess also because we seemed to have skipped autumn for winter this year in London. I do not actually mind, as I love the cold, all the scarves, gloves, hats and mulled wine. I also get a heavy boost of sunshine and vitamin D next month as I head off home to Brisbane for Christmas & New Year. On top of this, I get to meet the most adorable nephew for the first time. Beyond excited!


Before I head off, I wanted to get up to date on a few blog entries that have been on the backburner over the last few weeks/months. I have purposely not been blogging, but with good reason and that is I have decided to start studying again and work towards my P&I Insurance Qualification. I must admit I have actually been enjoying the study and the content; but did not enjoy so much the anxiety of being examined on this knowledge and that was my biggest hurdle. And I have now just completed my first exam, yey! I do not know if I have passed yet, but just getting to the exam in the first place was an achievement after an absence of 8 years from studying.

During this time however, I have still been baking to keep me motivated and one of the young brokers I do work with had been requesting (pestering) me to make a Battenberg cake for a few months now. I was a bit hesitant as I had never even tasted one let alone make one, but it was surprisingly not too difficult.


Battenberg Cake

175g unsalted butter, at room temperature
175g caster sugar
3 eggs, at room temperature, beaten
1/2 teaspoon
175g self-raising flour
1 tablespoon milk
pink food colouring

Icing
350g marzipan
8 tablespoons apricot jam

Tin - a 20 x 15 cm Battenberg tin or an 18cm square cake tin, greased with butter and the base lined with greaseproof paper, and divided in two halves with tin foil.

Or this was my improvised version...


Preheat the oven to 180 degree celcius. Put the butter and sugar into the mixer and mix until light in colour and very creamy in texture. Mix the eggs and vanilla, then gradually add to the butter mixture, beating well after each addition. Sift the flour into the bowl, add the milk and gently fold the ingredients together using a large metal spoon. Divide the mixture in half.
Spoon one half into 2 sections of the Battenberg tin or into half of the divided square tin (make sure the foil divider is folder over the side of the tin so it is well secured), and spread evenly. Add the food colouring a few drops at a time to the second portion of mixture, mixing it in well so there are no streaks; the colour will tend to darken on baking, so don't overdo it. Spoon this pink mixture into the remaining sections of the Battenberg tin or the other side of the divided tin. Spread evenly, then bake for 25 to 30 minutes, until firm to the touch. Remove from the oven and run a round-bladed knife around the inside of the tin and the dividers to loosen the sponge, but do not un-mould. Stand the tine on a wire rack and cool completely. 

Carefully turn out the sponge and remove the lining paper. If the cakes have risen unevenly in the oven, trim them with a long sharp knife so that the short sides are exactly square. 


If using a the square tin, cut each sponge in half lengthwise. Brush of any crumbs. Roll out the marzipan on a work surface lightly dusted with cornflour or icing sugar to a rectangle measuring 20 x 30 cm. Heat the apricot jam with a tablespoon of water, then push through a sieve to make a smooth puree.

Brush one long side of the strip of pink cake with jam and set it jam side down on the marzipan, so it is lined up along one short side. Brush the 3 other long sides of this strip with jam and set a yellowed-coloured strip, lightly brushed on the long sides with jam, next to it and another one, also brushed with jam, on top of it.


Lightly brush jam on the last pink strip and place it on top of the yellow one to make a two layered chequerboard patterns. Wrap the marzipan neatly over and around the whole cake, leaving the ends visible. Trim off any excess marzipan and slice  off the ends to neaten. The top can be left plain, or pinched along the edges decoratively. Store in an airtight container. 


I can now say I have successfully made a Battenberg cake and I was quite pleased with the results (and my make shift tin). I think I will have to make this one again though… so I can at least try it!

Happy Baking x

Sweet & Salty Popcorn

I use to love going to the cinema. My friends and I back in Australia use to go for a girls night about every two weeks as it was a cheap night out for us and a good way to catch up frequently. 

Now that I live in London, going to the cinema is definitely a 'pay day' activity (though most things in London are pay day activities), so I don't tend to go nearly as much as I use too. 

At the weekend, I was lucky enough to catch two films, The Fifth Estate and Captain Phillips.

I enjoyed both films, however Captain Phillips really stood out for me and I thought was brilliant. Though the film struck me on another level, as I work in Marine Underwriting, it was really confronting to see what the crew of these ships can actually be confronted with in in their everyday job. Its very easy to remove yourself from what we do in the London office from the reality of what can happen at seas everyday. It is definitely
 a must see, and Tom Hanks is fantastic (as always). 

Anyway, I thought I would just share my little tip for making going to the cinema a little bit more enjoyable and that is making your own popcorn. Seriously so much better than the stale stuff they serve for way over the top prices.

Sweet and Salty Popcorn 

60ml Vegetable Oil 
120g Popcorn kernels 
60g sugar 
1 tsp sea salt 

Heat oil over medium heat in a large saucepan and add the popcorn kernels. 
Cover the pan with a well fitting lid and shake to coat the kernels with oil. 
When the oil starts to sizzle, sprinkle the sugar over the kernels. 
Replace the lid and continue to shake the pan occasionally until the popping stops. 

Remove from the heat and allow to stand for 30 seconds. 
Toss the popcorn and salt together. 

And so a special treat, maybe mix some sweets into the bag!


Happy Baking x

The perfect English countryside wedding - Mr & Mrs Wheeler

I would like to say thank you to some of my readers for pestering me to write. I have actually been surprised at the number of people who I did not even know read my blog and noticed my absence over the last few months. Most of the time when I write an entry, I just assume no one will actually read it. I have always blogged for myself, but it is nice to know people actually like to see what I have been up too baking wise. So thank you!


It has been awhile since my last entry and a lot has changed in my life since then. I have had an amazing summer and had many new experiences (the good and the not so good), but such is life and these experiences are what it’s all about right?

Anyway, today I wanted to dedicate my first entry back to the new Mr & Mrs Wheeler. I had the pleasure of being involved in their big day and loved every minute of it and want to take this opportunity to wish them the best of luck with their life together.

My lovely friend Mel (the beautiful bride) asked me if I could assist Simon's (the handsome groom) mum with the Afternoon Tea. I provided ten dozen cupcakes, alongside the numerous loaf cakes his mum would be baking and as well as proper fruit wedding cake (which I was very excited for, as I love fruitcake). I was more than happy to provide my services and had the well-equipped kitchen down on the farm in Kent all to myself on the Friday to get on with the baking.

 On the big day, there was a lot to be done including many meters of bunting to be hung. We did get there in the end, though I was still running around in wellies as guests started to arrive and only my make up done.

I took a few photos on the day to share, starting with the cupcakes...


Decorated with 100's and 100's all the way from Australia


Vanilla with Vanilla Buttercream


Chocolate with Chocolate Buttercream


Chocolate Guinness with Creamcheese Icing (the fights over these ones were hilarious..)


Carrot Cake with Creamcheese Icing


the many loaf cakes


...and the delicious wedding cake, complete with love birds!


Some of the many meters of bunting inside the barn...

Photo by Kiti Swannell


Then the wedding began!


All the lovely ladies


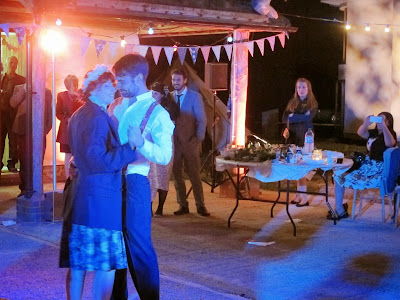
The first dance

The best "men"


The beautiful bride and me


Happy Baking x

Butterfly Cookies

The sun (including some warmth) is finally out in London. It has only taken until the end of April and I still cannot believe it was snowing only 4 weeks ago. Snow. In April. Mental.


It has been a hectic start to the year and with May approaching I realised I am way behind in my blog updates, only two this month…eek! I have had a nice flow of orders to keep my busy, which is fantastic, however that does mean I have less time to try out new recipes for myself. I attempt to balance this out by baking for my friend’s birthdays and try out recipes mainly for my own curiosity… and because my friends are awesome and deserve cake!

Just recently, I baked the Brooklyn Blackout Cake from the first Hummingbird Bakery cookbook for my friend LK’s birthday. As LK loves cakes, I added a few bits to make it look like a cat and the fact she was wearing a matching shirt was merely a coincidence.


But back to the cookies. A few months ago, I subscribed to the Cake Decorating magazines to expand my baking skills. So far, I have received about 14 issues and have only just finished reading/trialling issue 1. The first thing in the book is these butterfly cookies, which are perfect for spring and great for beginners  learning about flooding cookies with royal icing.


Not a bad for my first at home attempt.

Happy Baking x